¶ Spider M1 User Manual

A Letter to Users
Dear users:
Thank you for choosing our product. For the best experience, please read the instructions before operating the machine. Our teams are always ready to renderyou the best services. Please contact us via the phone number or e-mail address provided at the end when you have any problem.
Fora better using experience of our product, you can also learn how to use the engraving machine in the following ways: View the corresponding instructions and videos in the TF card. Visit official website www.spider-laser.com to find the relevant software/hardware information, contact details, operation and maintenance instructions.
¶ Instructions for Use
For engraving and cutting purpose, please allow the work piece to be exposed to the high-density laser beam which is emitted by the laser engraver. And please follow the instructions below when operate it:
For engraving and cutting purpose, please allow the work piece to be exposed to the high-density laser beam which is emitted by the laser engraver. And please follow the instructions below when operate it:
1. It is advisable to run the machine under well-ventilated conditions, as laser engraver may generate a small amount of fume or gas. It is prohibited to store the machine in areas which close to combustible and explosive substances, volatile solvents or sources of heat. Instead, please store it in a well-ventilated, cool and dust-free place.
2. Make sure that only the specific attached power cord rather than other similar power cords is used during installation. And lt is prohibited to come in contact with electronic areas with hands or other tools when the machine is connected to a power supply.
3. Clean the laser module with a dry cloth regularly when the power is off. And switch off the machine when it is offline for an extended period oftime, and unplug the power cord;
4. Ensure to run the laser at 0℃-35℃ environment temperature. Operation at sub-zero temperature is prohibited. An also don't operate the machine in a wet environment or in thunderstorm weather;
5. It is prohibited that any act of touching the moving parts and the laser module at work;
6. Please place a flat object such as an aluminum alloy or stainless steel plate on the workbench before engraving. Forthese objects can'tbe easily penetrated by the laser, this operation will protect your workbench of being engraved.And then you can place the engraving material.
7. Wear goggles to prevent vision damage arising from exposure to the laser spot during laser engraving operation;
8. For avoiding personal injury, children under 12 years old are not allowed to run the machine without an adult tutorial.
9. Put in place fire extinguishers in case of use, and this shall be regularly checked. It is prohibited to keep the machine unattended while it is running;
10. Users should comply with the laws and regulations of the corresponding countries and regions where the equipment is located (used), abide by professional ethics, pay attention to safety obligations, and strictly prohibit the use of our products or equipment for any illegal purposes. Spider Ml will not be responsible for any violators' legal liability under any circumstance.
¶ Specification
| Model | Spider M1/Spider M1 Pro/Spider M1 Max | Input | 100-240V~50-60Hz |
| Laser power | 5W/10W | Types of supporting materials | Cardboard, wood, bamboo, rubber, leather, fabric, acrylic, plastic, etc. |
| Machine size | 100*100*485(685)mm | Output | DC12V, 5A |
| Safety class | Class I(FDA classification standard) | Range of operation temperature | 0℃~35℃ |
| Net weight | 3.3kg/3.6kg | Safety certification | IEC60825, FDA, CE, RoHS, FCC, UKCA, PSE, UL |
| Laser engraving software | Laser GRBL, LightBurn | Engraving size | 200/400*∞ |
| Operation system | Windows/MacOS/IOS/Android | Laser source | Semiconductor laser unit |
| Format files | jpeg, jpg, png, bmp, svg, dxf | Laser wave length | 455±5nm |
¶ Parts List

¶ Equipment Introduction

¶ Delicated Frame Installation Guide
Delicated frame supports Spider Ml engraving objects from 200mm to 400m. Please take below picture for reference.4 corners are locked with two M4 screws.

¶ Y-axis Rotary Roller Installation Guide


¶ Spider M1 Operation Instructions
¶ 1. Preparations Before Engraving
Please insert the TF card into the TF card slot before operation, and plug in the 12V adapter power supply. Then turn on the power switch, the red light will on. After this Spider Ml will be ready for work. BTW, the TF card that comes with the machine contains the tutorials of LightBurn and Laser GRBL. You can get the relevant informa- tion from the TF card.

Note: no matter what method you use, please make sure you inserted the TF card before engraving, and use a clean cloth which a cloth dampened with alcohol to wipe the protective lens of the laser module to ensure the best engraving effect.
¶ 2. Four Modes to Operate the Laser Engraver
There are 4 operation modes: type-B real-time operation, mobile app wireless operation, PC web wireless terminal operation, and TF card operation.
1.Type-B real-time working: for real-time working by Type-B, please refer to the tutorial in the TF card.
2.Mobile app wireless operation:
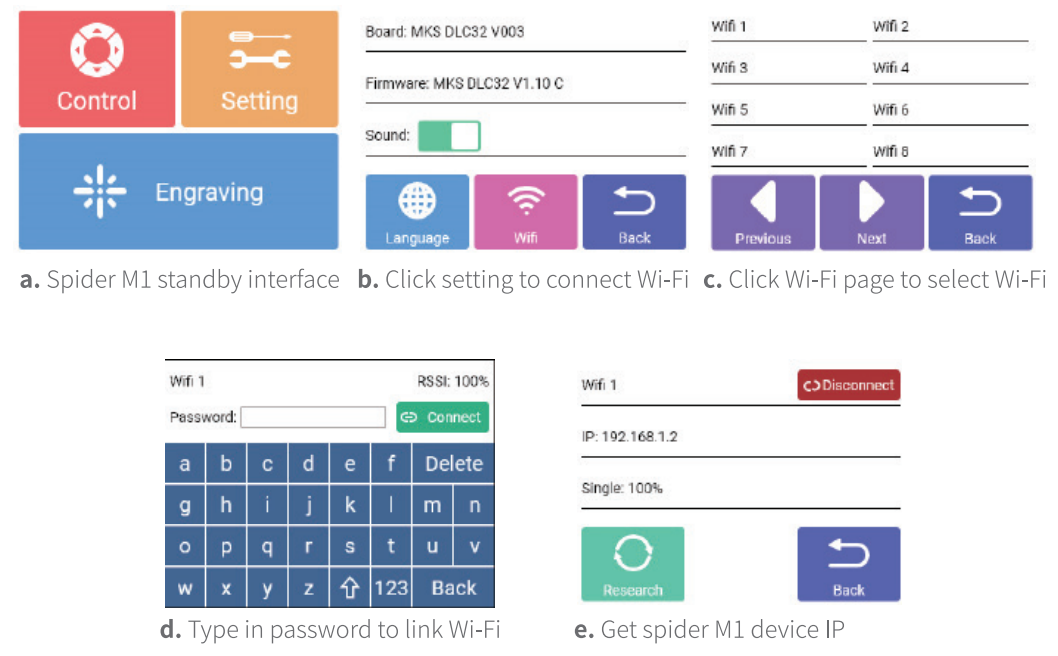
Step 1: to connect Wi-Fifirst.
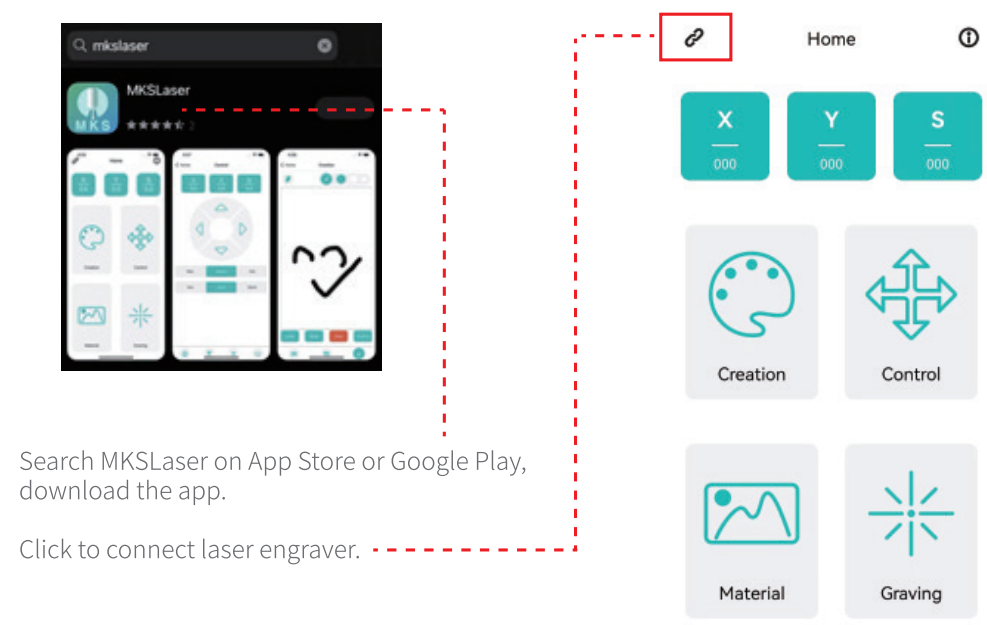
Step 2: to download the MKSLaser APP from Apple app store or Google Play.
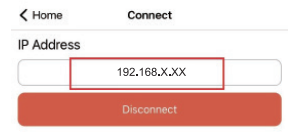
Step 3: type in the IP which shown on Spider M1, and make sure that the mobile phone and deviceare in the same LAN, click Connect inthe upper leftcorner, type in the device IP, click Connect, then return to the home page.
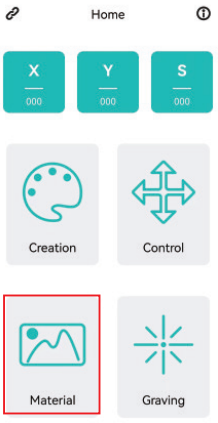
Step 4: select Material.
Step 5: click Creation.
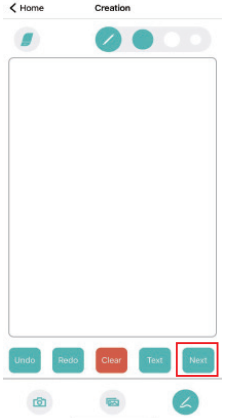
Step 6: engraving parameters setting.
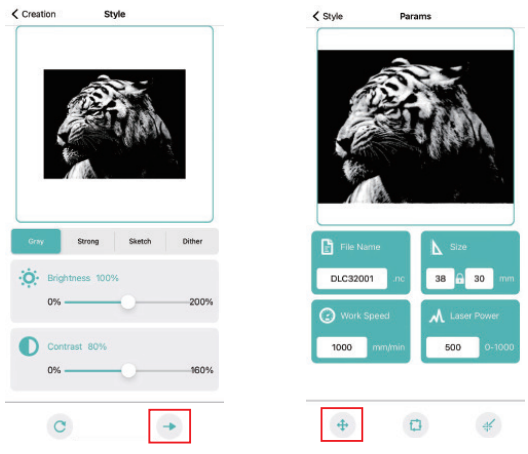
Step 7: set the engraving position.
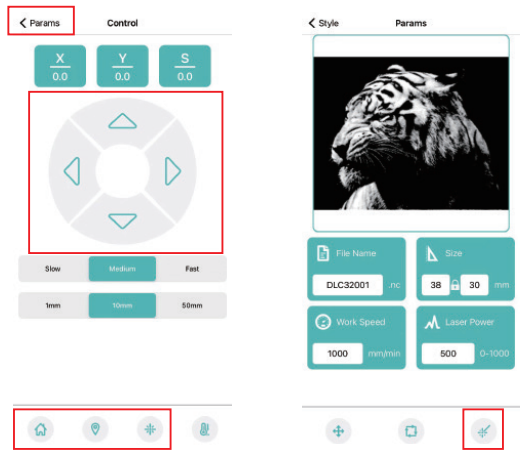
Step 8: start engraving (after starting engraving, you can exit the APP on mobile phone or connect it to the terminal,it wil not affect the engraving).
¶ 3.PC web wireless terminal operation:
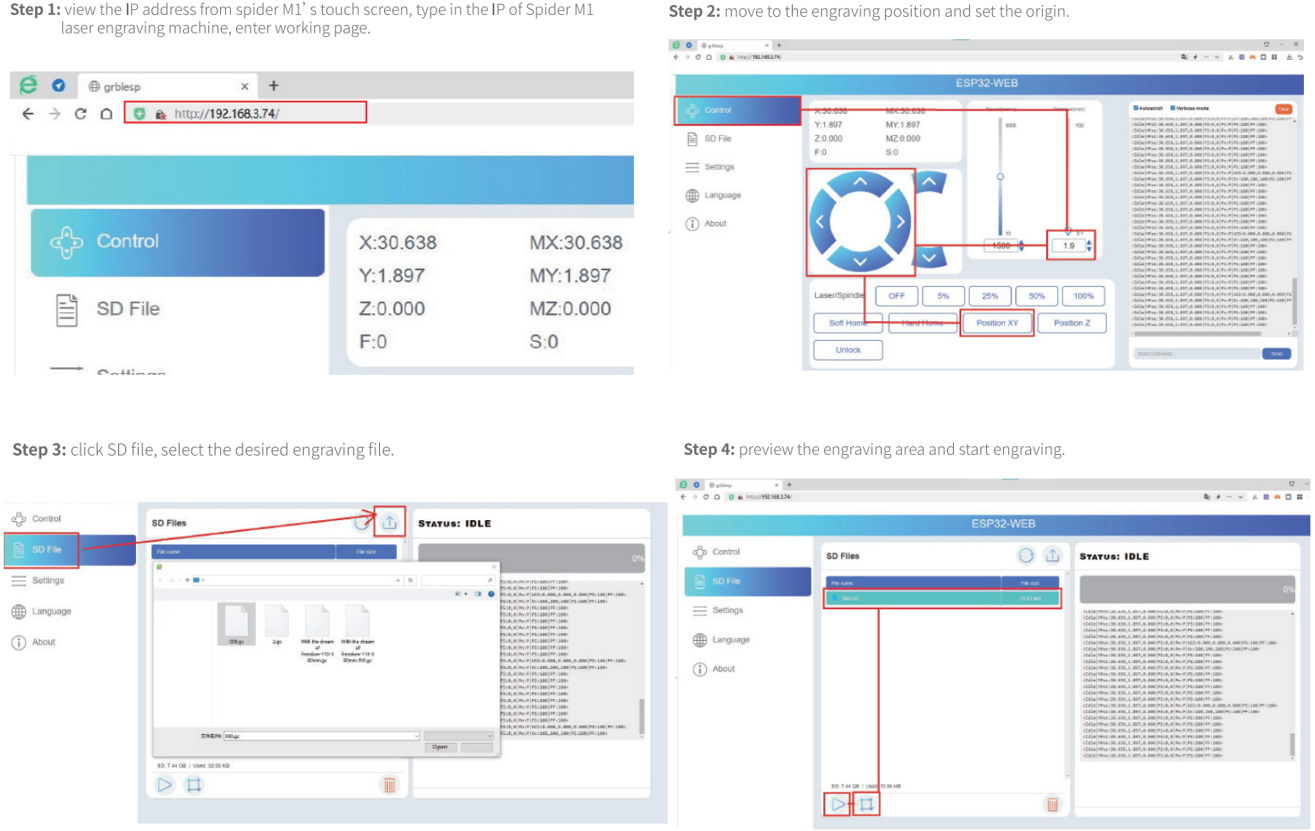
Step 1: view the IP address from spider Ml's touch screen, type in the IP of Spider M1 laser engraving machine, enter working page.
Step 2: move to the engraving position and set the origin.
Step 3: click SD file, select the desired engraving file.
Step 4: preview the engraving area and start engraving.
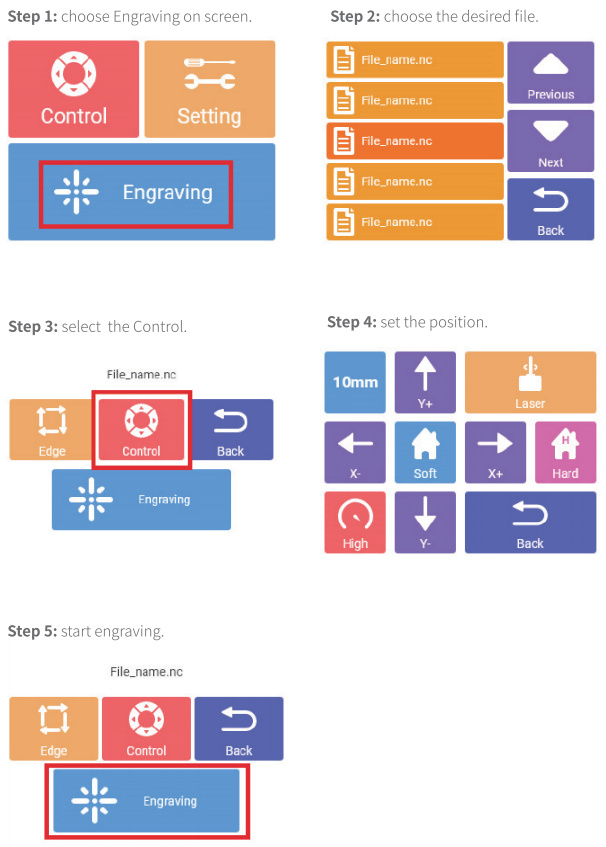
¶ 4.TF Card
Copy the engraving file to the TF card through the card reader, and plug into the TF card hoider of the spider Ml, and then you can start your engraving or cutting.
¶ Exception Handling
Q1: When operating the engraving machine under wireless environment, the laser engraver cannot be connected, or cannot be operated after connection.
A: first please check whether the engraver is in the same local area network with PC or mobile phone, then restart the engraving machine, and reconnect to the network.
Q2: The Y-axis is offset during the engraving process.
A: clean the Y-axis roller of the engraving machine, clean the engraving plane, and make sure that the bottom surface of the engraving machine does not scrape the engraving surface.
Q3: The laser performance is obviously declined and the engraving depth cannot be reached.
A: clean the protective lens with a dust-free cloth or replace the protective lens.
If you have any questions, you can contact us.

¶ WARRANTY
Before returning the product and filling in a warranty, please contact after-sale person for going through after-sale formality. And attach this warranty card along with the returned machine.
Repair □ Change □ Return □
Name___________ Telephone___________ Address___________
Serigl Number___________ Order Number ___________
Channel___________ Date of Purchase Day ___________
Manufacture Problem Description and Return Reasons/suggestion ___________ Repair Records ___________
Note: Client needs to fill in basic info. and return reasons. Repair records shall be retained for technicians.
※ Users should abide by the laws and regulations of the country and region where the equipment is located (place of use), abide by professional ethics, and pay attention to safety obligations. It is strictly forbidden to use our products or equipment for any illegal purpose. Our company is not responsible for the relevant legal responsibilities that the violator should bear.
Since each model is different, the actual product may be different from the picture. Please refer to the actual product.
The final interpretation right belongs to Shenzhen Sky Electronics Co, Ltd.
