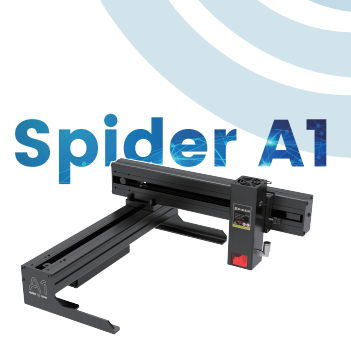
¶ Spider A1 User Manual
¶ A Letter to Customers
Dear Valued Customer,
Thank you for choosing Spider A1. To ensure your convenience, please carefully read this Manual before operating the machine and strictly follow the instructions provided. The Spider A1 team is always ready to provide you with high-quality service. If you encounter any issues during use, please contact us via the phone or email provided at the end of this Manual. To enhance your experience with our product, you can also access operational knowledge through the following methods.
User Manual on TF Card: Relevant user instructions and videos can be found on the TF card.
Visit Spider A1 Official Website: www.spiderlasers.com for information on software, hardware, contact details, device operation, and maintenance.
Best regards,
Spider Laser Team
¶ Guidelines for Safe Operation
The laser engraving machine utilizes a high-density laser beam to engrave or cut materials, generating high temperatures on the material's surface to vaporize it without combustion. However, most materials are inherently flammable and may ignite, resulting in an open flame that could damage the machine and its surroundings. Please adhere to the following operating principles:
1. Avoid placing this product near flammable, explosive substances, volatile solvents, or high heat sources. Keep it in a well-ventilated, cool, and low-dust environment.
2. Use only the power cord provided with this product during installation: do not substitute with other power cords.
3. Regularly clean the machine body and laser module with a dry cloth when the power is disconnected.
4. The operating temperature for the laser is between 0° ℃-35 ℃ : refrain from using it in below-zero temperatures or humid environments, and never operate it during thunderstorms.
5. If not using the product for an extended period, turn it off and disconnect the power cord.
6. When the product is powered on, do not touch the electronic components or related areas with hands or other tools.
7. Avoid touching the moving mechanical parts and laser module while the product is in operation.
8. Before engraving. place a non-penetrable flat object such as aluminum alloy or stainless steel on the work surface and then position the material to be processed.
9. Always wear protective goggles during laser engraving to avoid eye injuries caused by direct exposure to the laser beam.
10. During the engraving process, slight smoke or odor may occur: operate in a well-ventilated area.
11. Children under the age of 10 should not use this product without adult supervision to prevent injuries.
12.Prepare a fire extinguisher as a precautionary measure and conduct regular maintenance and inspections. The machine should not run without supervision.
13. Users must comply with the laws and regulations of the country or region where the equipment is located or used, adhere to professional ethics, and fulfill safety responsibilities. The use of our products or equipment for any illegal purposes is strictly prohibited, and our company assumes no responsibility for any legal liabilities resulting from violations. Please read and strictly adhere to these guidelines for safe and responsible use of the laser engraving machine.
¶ UNBOX AND CHECK
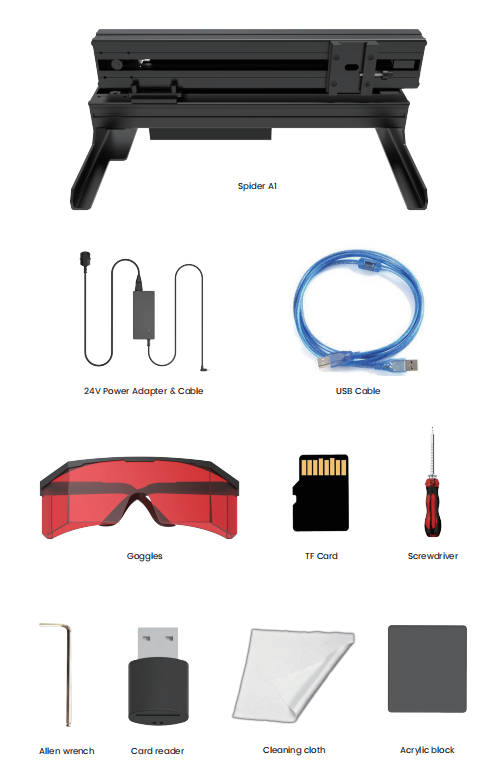
¶ Packing List
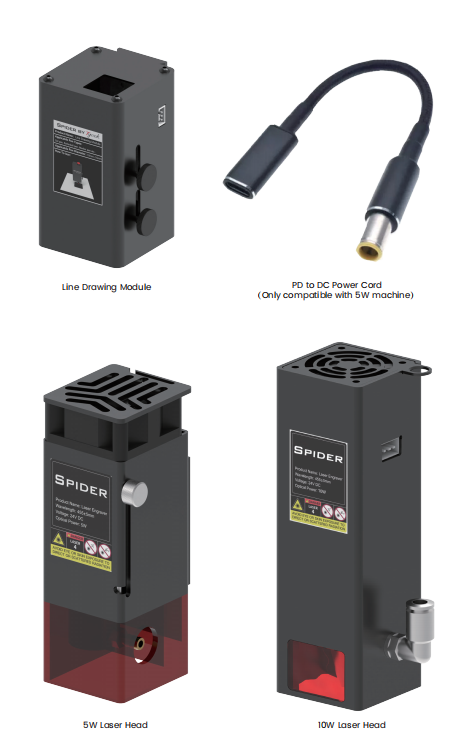
¶ More Accessories to Choose
¶ ASSEMBLE SPIDER A1
¶ Installing Spider A1
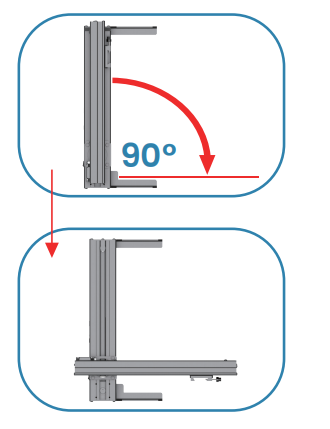
1.Cut off the ties like below picture shows.
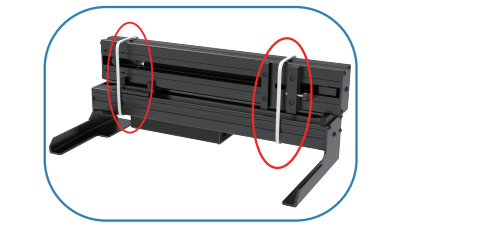
2. Rotate the x-axis 90° clockwise.
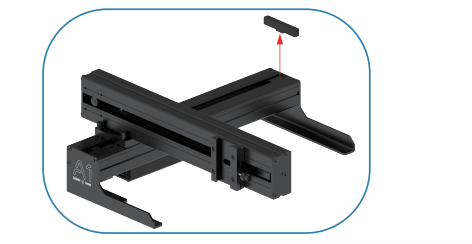
3.Take off the pad beneath the X-axis.
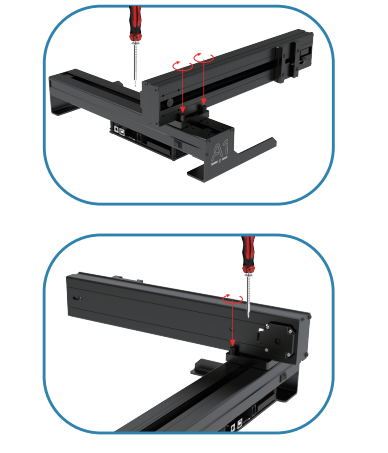
4.Tighten the three angle-fixing screws using a Phillips screwdriver.
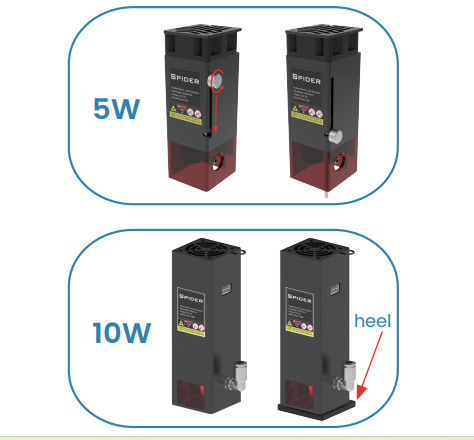
5.Install the laser head or line drawing module and tighten the thumb screw on the side to fix the height, then connect the cable.
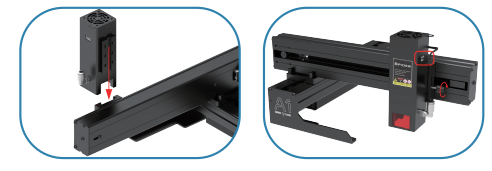
Tips: For 5W laser head, you can adjust the side rod to change the focal length.
For 10w laser head, you can use the acrylic board to adjust the focal length.
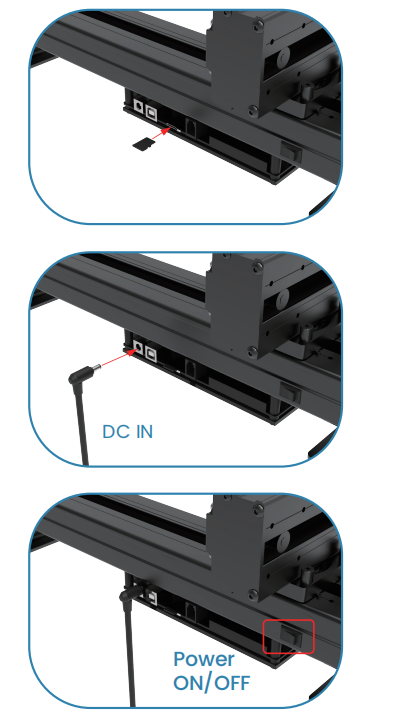
6.Insert the TF card, connect the power supply, and turn on the switch.
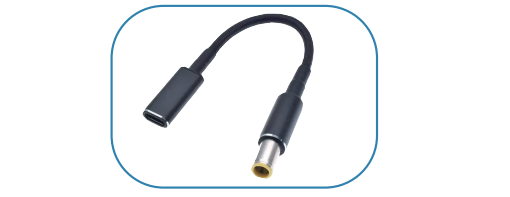
Tips: When there is a portable power bank needed, a PD to DC power code is necessary for the connection. The portable power supply function is only compatible with the 5w laser head.
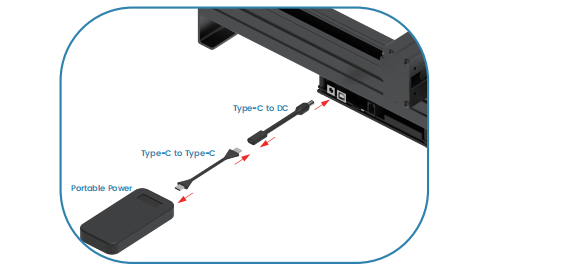
The portable power bank should come with a Type-C to Type-C power cord and must meet the following specifications:
Output port: Type-C, PD protocol output
Type-c output voltage: 20v, current: 3.25A
Connect the portable power bank to A1 by using the Type-C to Type-C power cord and the PD to DC power cord.
¶ How to use Spider A1
Spider A1 offers two connection methods: USB wired connection and WIFI wireless connection.
2.2.1 Wired Connection
1.Install the CH341 driver on the PC.
The Machine's TF card contains the installation program for the CH341 driver.
Follow the steps below:
Step 1: Connect the TF card to the computer via a card reader and copy the program named "CH3 41SER.EXE" to the computer.
Step 2: Power on Spider A1 and connect it to the computer using a USB cable.
Double-click to open the "CH3 41SER.EXE" program.
Step 3: Click "install and wait lor a moment until a pop-up appears, indicating “Driver installation successful”
2.Check whether the driver installation was successful:
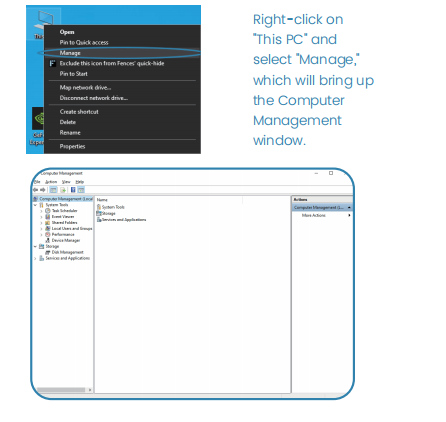
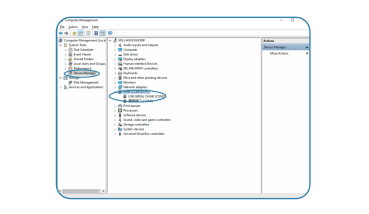
Select “Device Manager”, and “USB-SERIAL CH340” appears under the “Port" column, which means the installation is successful.
After connecting the Spider A1 to the computer with the USB cable, you can use the PC software “Lightburn” and "LaserGRBL" laser engraving software to operate.
3. After USB connection, operations on the device need to be performed in GRBL or Lightburn. Lightburn require a purchase to use, while GRBL is free and open-source software.

2.2.2 Wireless Connection
To begin with WiFi connection, please install the CH341 driver on PC, and then connect PC and Spider A1 with USB cable(please check the detailed steps in the "Wired Connection" section).Please ensure to install the firmware burning program. You can download the burning software from our website Spiderlasers.com" under "Firmware Download".
After software installation, follow these steps to connect Al via WiFi:
1. Open the software and select
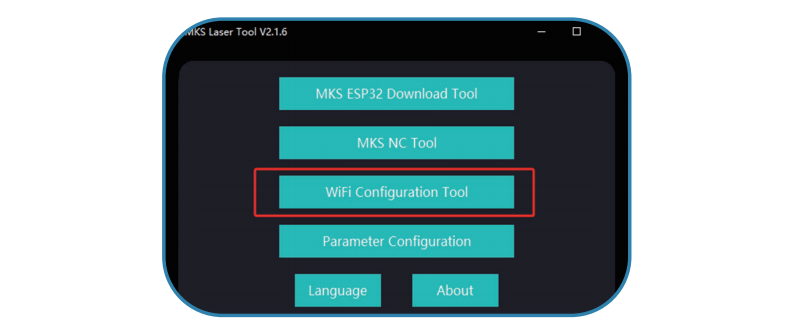
2. lf A1 is connected with PC, the COM port will display the current port. Click “Connect.”
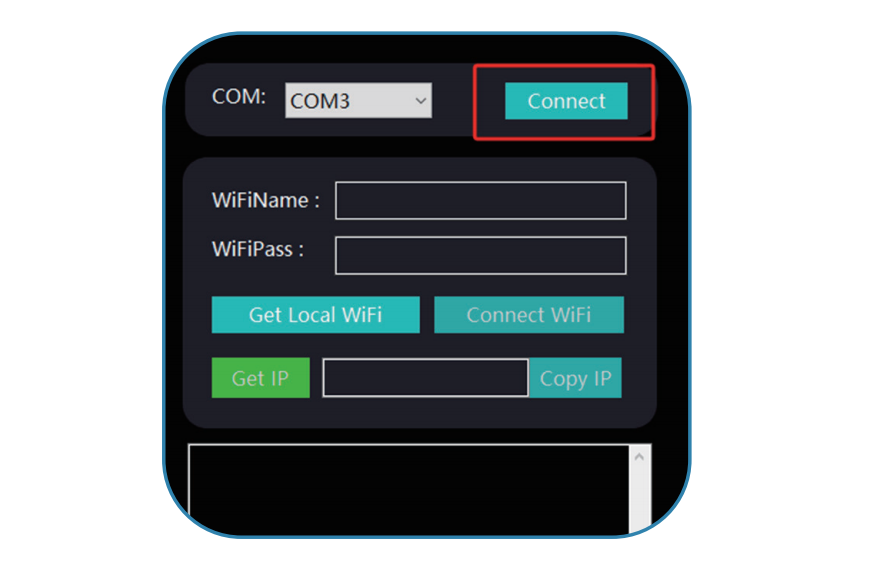
3. Upon successful connection, "OK" will be displayed.
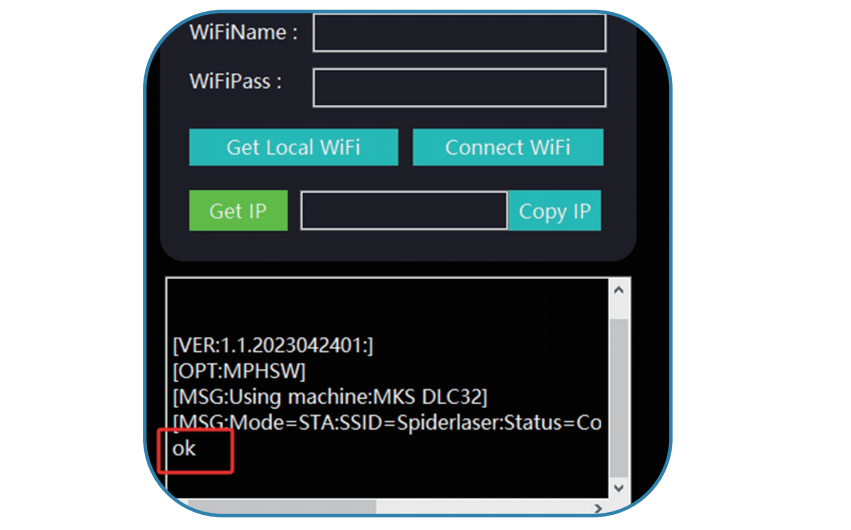
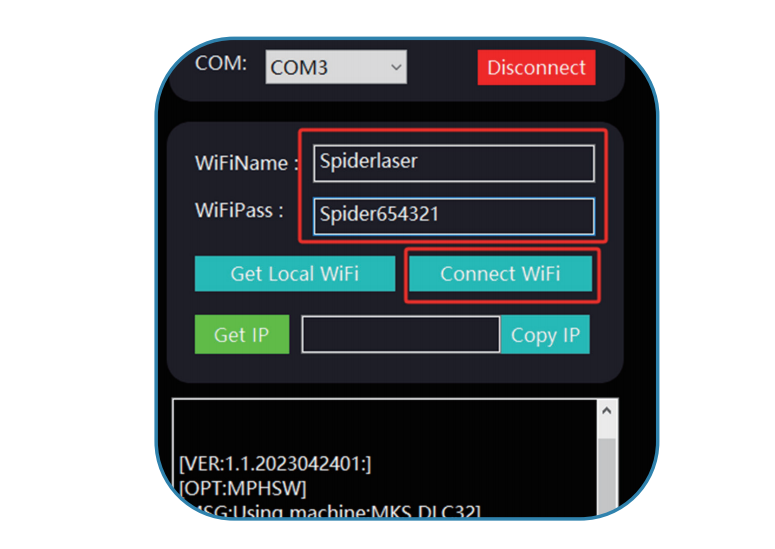
4. Enter the WiFi and WiFi password, then click “Connect WiFi.”
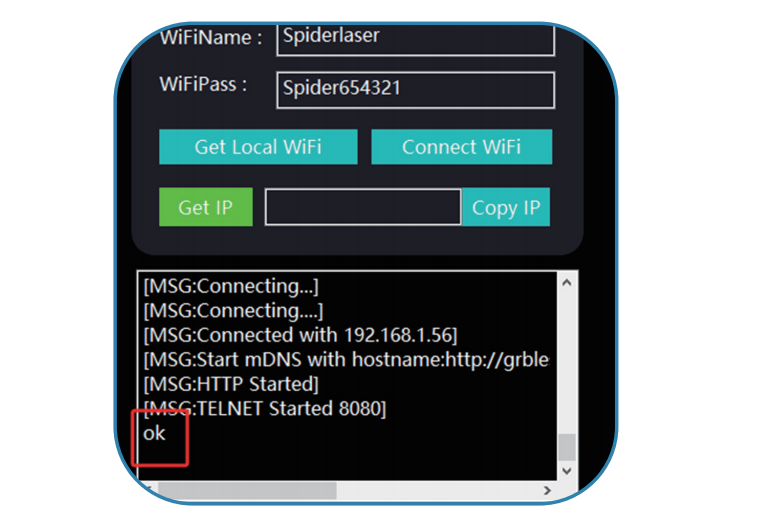
5. Wait for a while, when "OK" is displayed, it indicates that the device is successfully connected to WiFi.
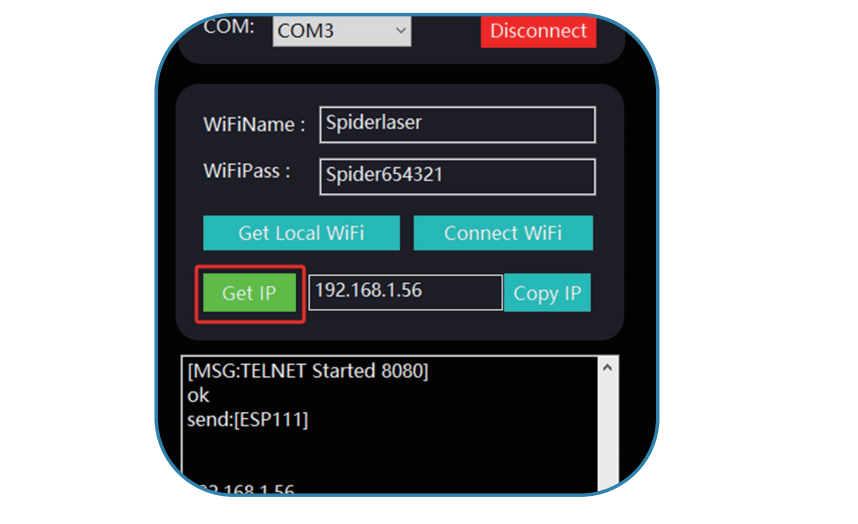
6. Click "Get Ip" to obtain A1's IP address (remember this address). Close the software and from now on, A1 will automatically connect to WiFi on startup without manual intervention.
7. Wait for a while, when "OK" is displayed, it indicates that the device is successfully connected to WiFi.
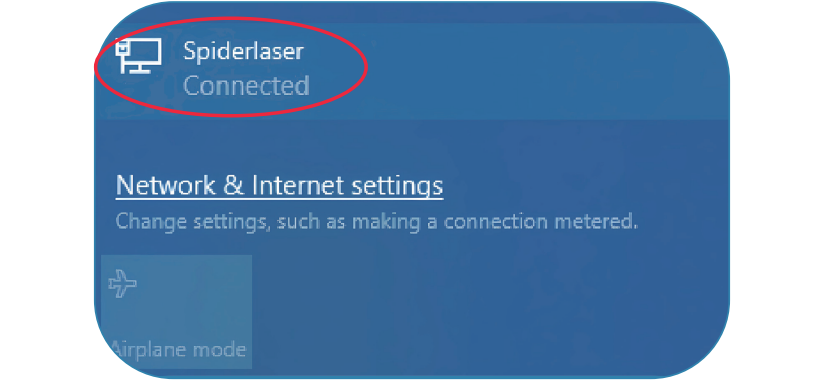

8. Enter the operation page of Spider A1 web terminal. Make preparations before starting on the “Control” page, that is, move the position of laser head and set the origin.
After entering the operation page, adjust the moving distance in the
“Distance” column recommended (0mm-20mm)
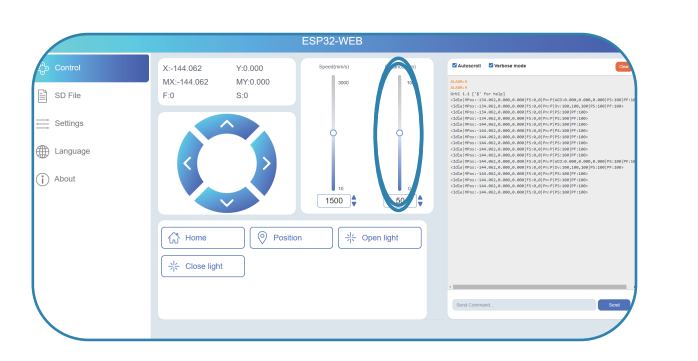
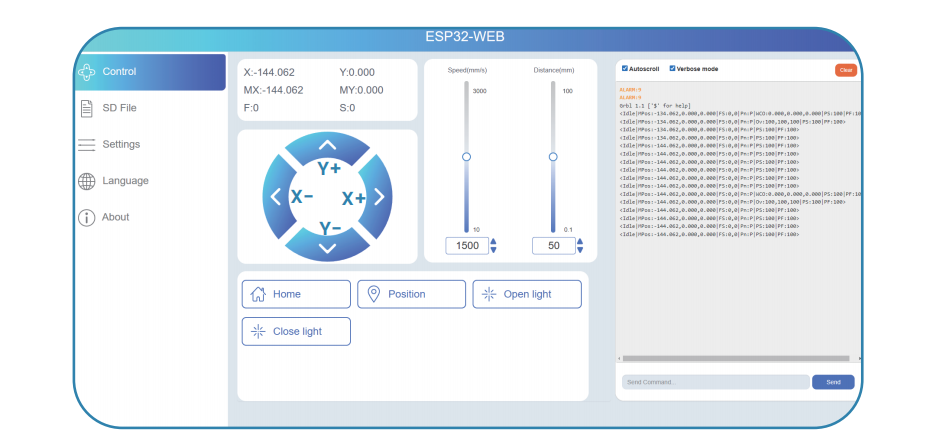
Click the arrow keys to control the laser head and move it to the lower-left corner of the frame (as shown in Figure 2 below). If you are not using a frame, move the laser head to the far-left position along the machine's X-axis. The corresponding relationship between the arrow keys and the machine's movement direction is illustrated in Figures 1 and 2.
Lick "Position XY" to set the origin
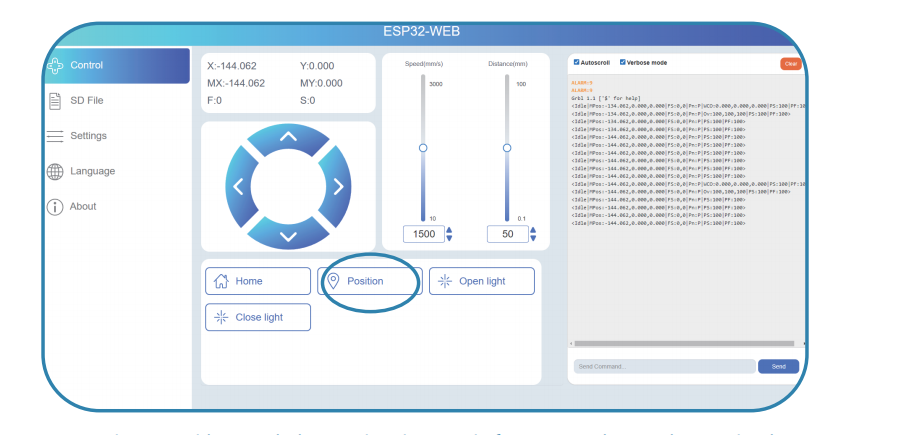
Set the working origin to the lower left corner in various design software to make it consistent with the setting of Spider A1.
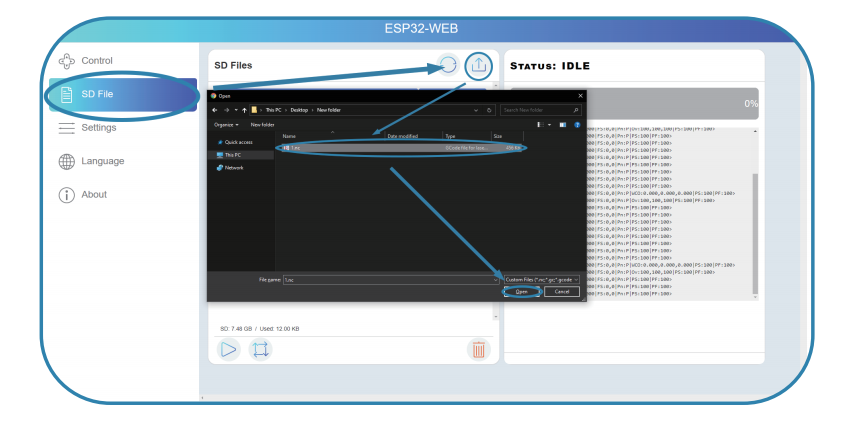
9. Click "SD File", select the working file and upload it to the web-side system.
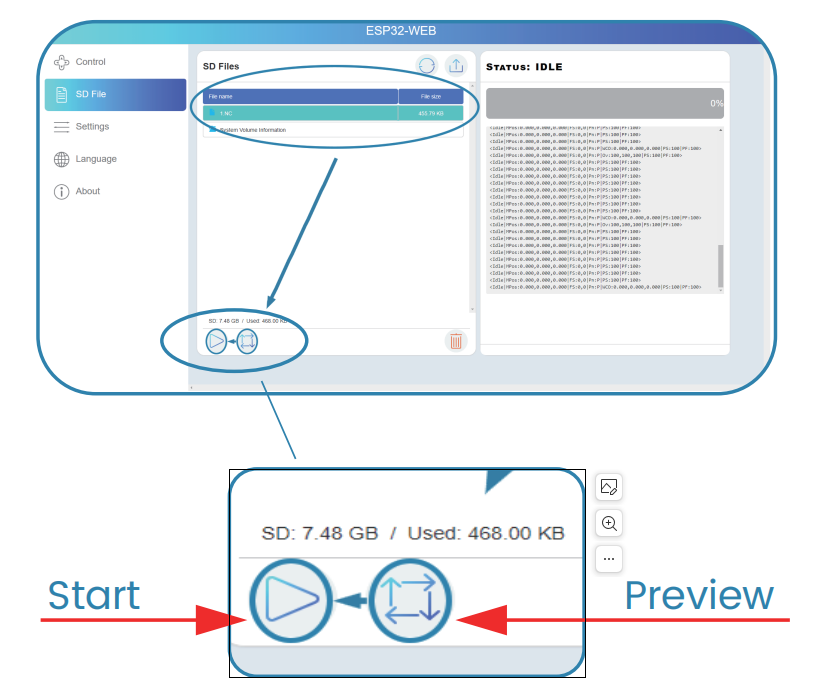
10. Select the file, preview the working area and start working after confirmation.
¶ Attachments
¶ PARAMETERS
Model: Spider A1
Machine size: 376*376*144mm
Net weight: 2.5KG
Operation system: Windows / Mac OS
Input: 100-240V ~ 50-60Hz
Output: DC 24V 1A
Laser wave length: 455±5nm
Laser power: 5w/10W
Safety class: CLASS I(FDA classification standard)
Laser engraving software: LaserGRBL, LightBurn
Format files: jpeg, png, bmp, svg, dxf
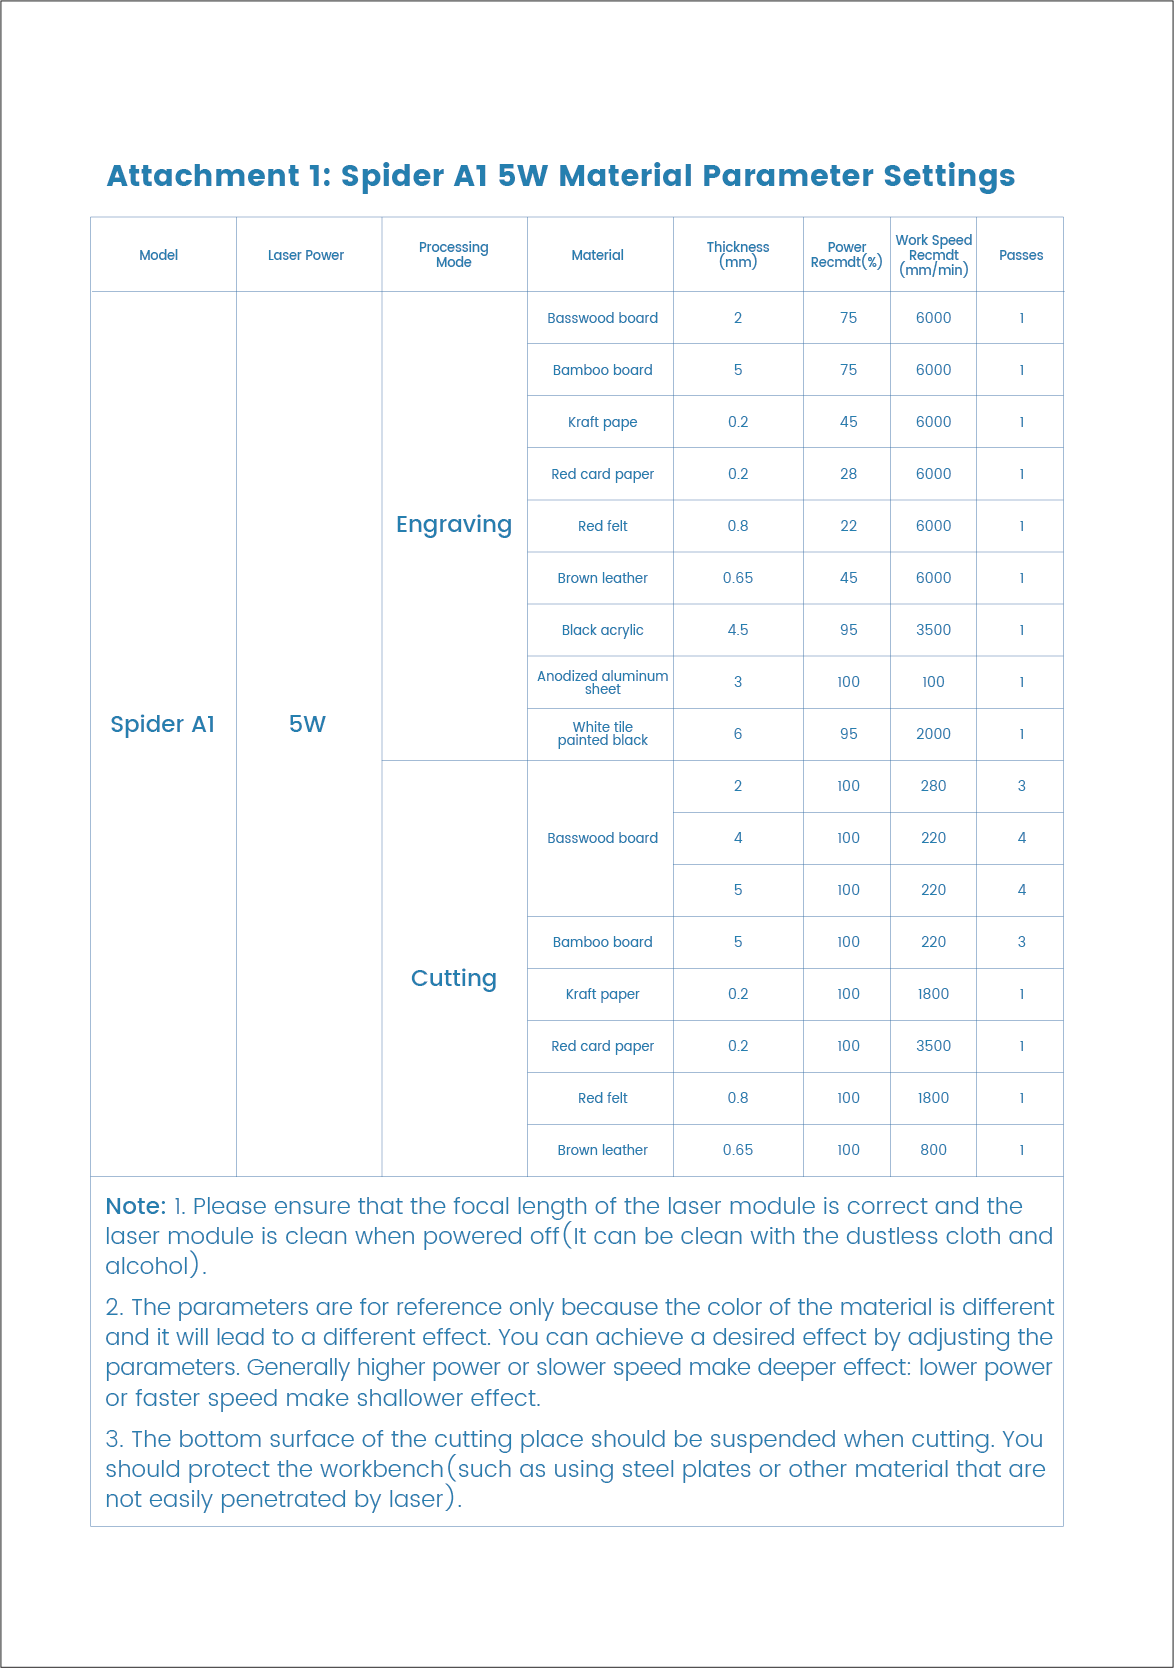
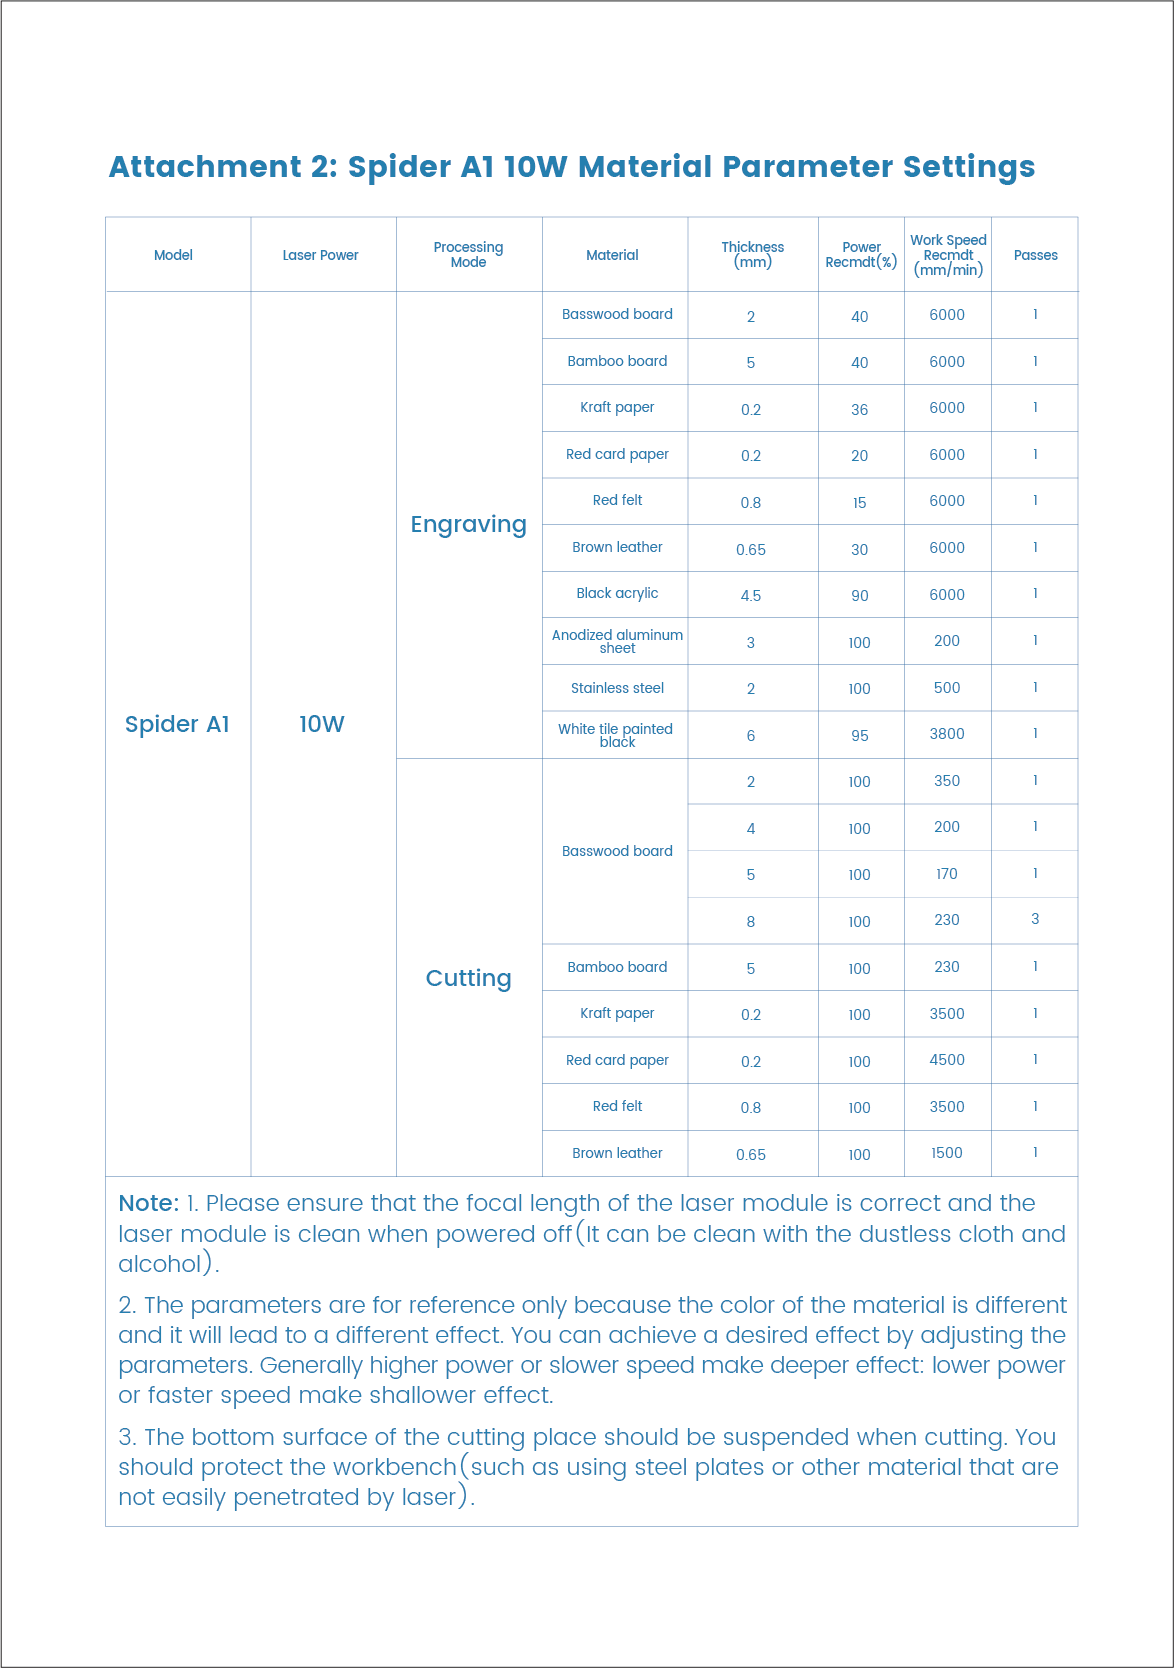
Type of supporting materials: Cardboard, wood, bamboo, rubber, leather, fabric, acrylic, painted metal, plastic, etc.
¶ WARRANTY
Before returning the product and filling in a warranty, please contact after-sale person for going through after-sale formality. And attach this warranty card along with the returned machine.
Repair □ Change □ Return □
Name______________________ Telephone______________________ Address______________________
Serial Number______________________ Order Number _______________________________________
Channel______________________________ Date of Purchase Day _______________________________
Manufacture Problem Description and Return Reasons/suggestion;_____________________________________
Repair Records________________________________________________________________________________________
Note: Client needs to fill in basic info. and return reasons. Repair records shall be retained for technicians.
※ Users should abide by the laws and regulations of the country and region where the equipment is located (place of use), abide by professional ethics, and pay attention to safety obligations. It is strictly forbidden to use our products or equipment for any illegal purpose. Our company is not responsible for the relevant legal responsibilities that the violator should bear.
Since each model is different, the actual product may be different from the picture. Please refer to the actual product.
The final interpretation right belongs to Shenzhen Sky Electronics Co, Ltd.